How do I extract text from a screenshot without uploading it?
What browser OCR actually reads: measured similarity on six fixtures, the 515 characters it invented from a photo with no text in it and the model download you pay for once.
Most OCR sites take your screenshot, post it to a server and read it there. That's fine for a photo of a restaurant menu. It's a different decision for a payslip, a passport page or a screenshot of a private chat. Our image to text tool runs the recognition inside your browser tab, so the file stays on your disk and the text appears beside it.
The engine is Tesseract, compiled to WebAssembly and shipped with the page. Your first run downloads a worker script, the WebAssembly core and one language model. Your browser caches all three. After that there's nothing left to fetch.
Does my screenshot get uploaded?
No. There's no upload endpoint in this codebase that could receive one. The only network traffic the tool makes is same-origin: 3 requests totaling about 6 MB for English, every one of them served from this domain. Your file is decoded inside the page, handed to the engine as pixels and turned into text there. Open the network tab during a run and you'll see model chunks arriving and nothing carrying your image away. Our privacy page lists the only things we collect, which is page views and anonymous tool counts.
The incumbents work the other way around. Smallpdf and iLovePDF both do the recognition on their own machines, so your file has to reach them before anything happens. Their answer to the privacy question is a retention promise: the copy gets deleted after a while. We quoted their retention wording in the JPG to PDF walkthrough. A retention promise tells you how long your passport scan sits on someone else's disk. It says nothing about whether it gets there. Here that question doesn't come up.
How accurate is it on a real screenshot?
We measured it. Six fixtures with known text went through the engine on 2026-08-11, and the score below is a character by character comparison of the output against the text we knew was in the picture. The fixtures are synthetic: HTML pages rendered in a browser and captured as real screenshots, with the degraded one blurred and rotated in CSS so it imitates a bad phone capture.
| Fixture | Language | Similarity | Confidence |
|---|---|---|---|
| Clean screenshot | English | 100.0% | 95 |
| Dense paragraph | English | 100.0% | 95 |
| Simulated degraded capture | English | 92.4% | 65 |
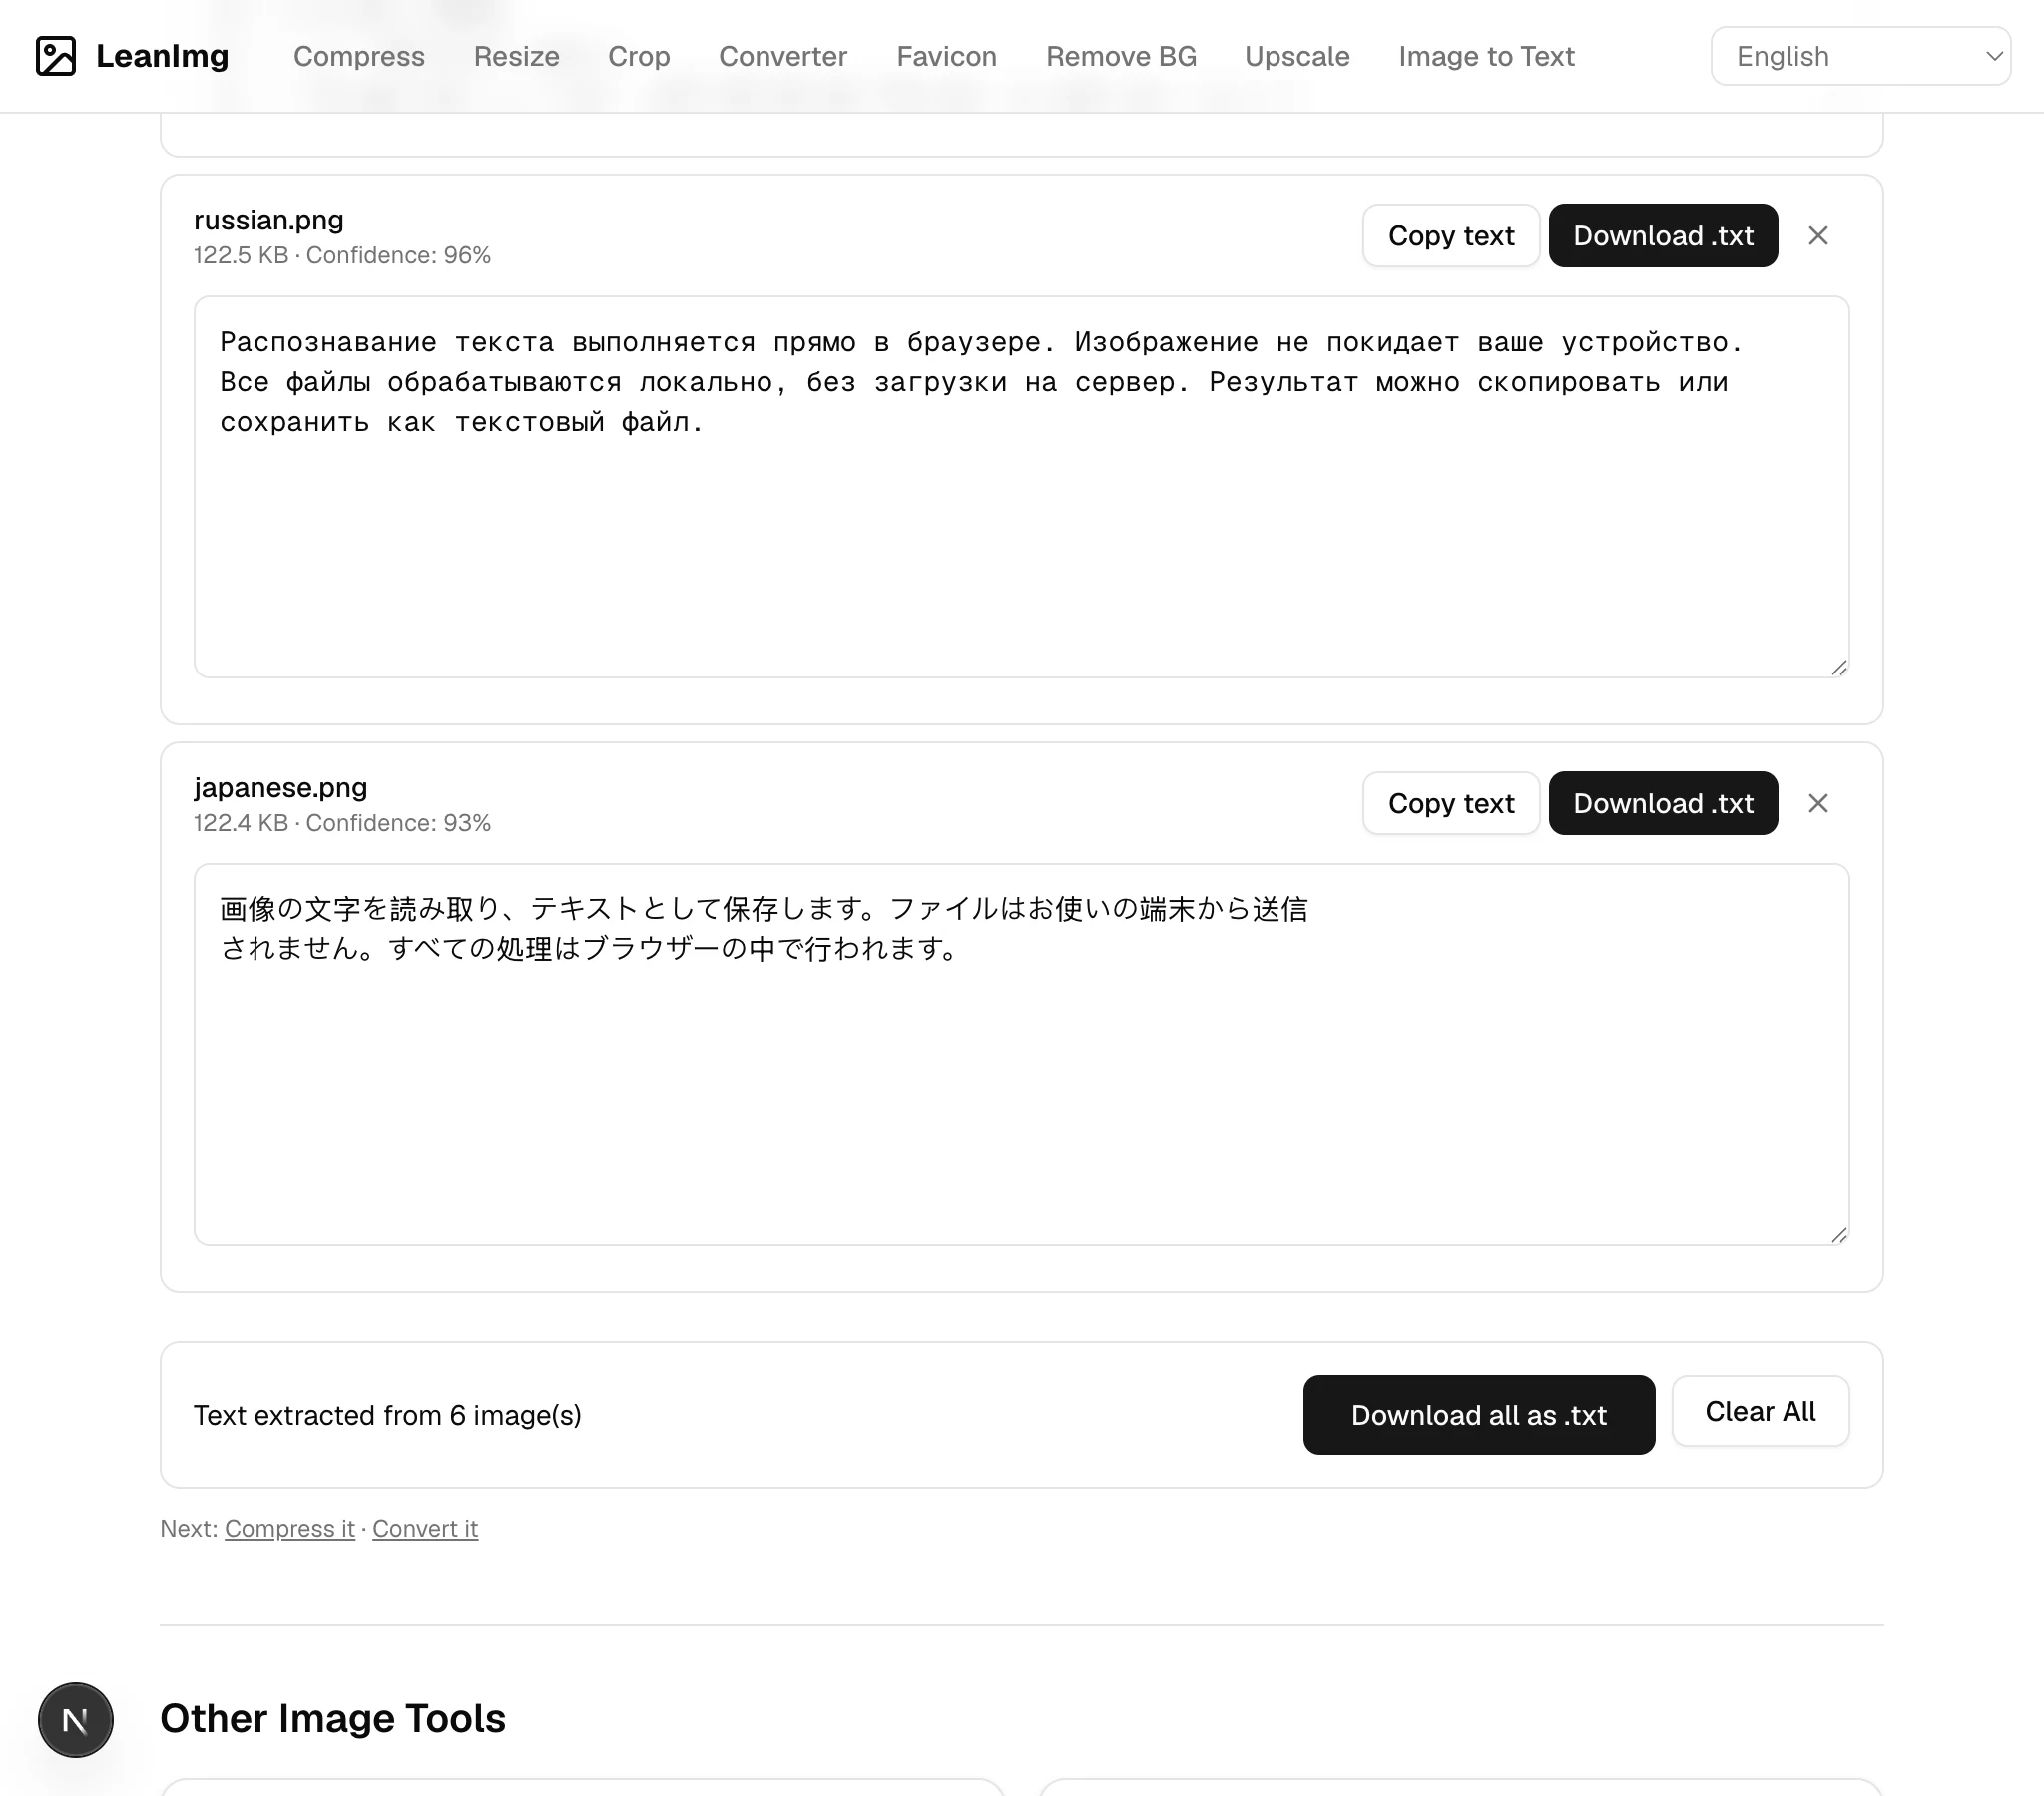
| Russian sample | Russian | 100.0% | 96 |
| Japanese sample | Japanese | 100.0% | 93 |
| Photo with no text in it | English | 515 characters of invented text | 32 |
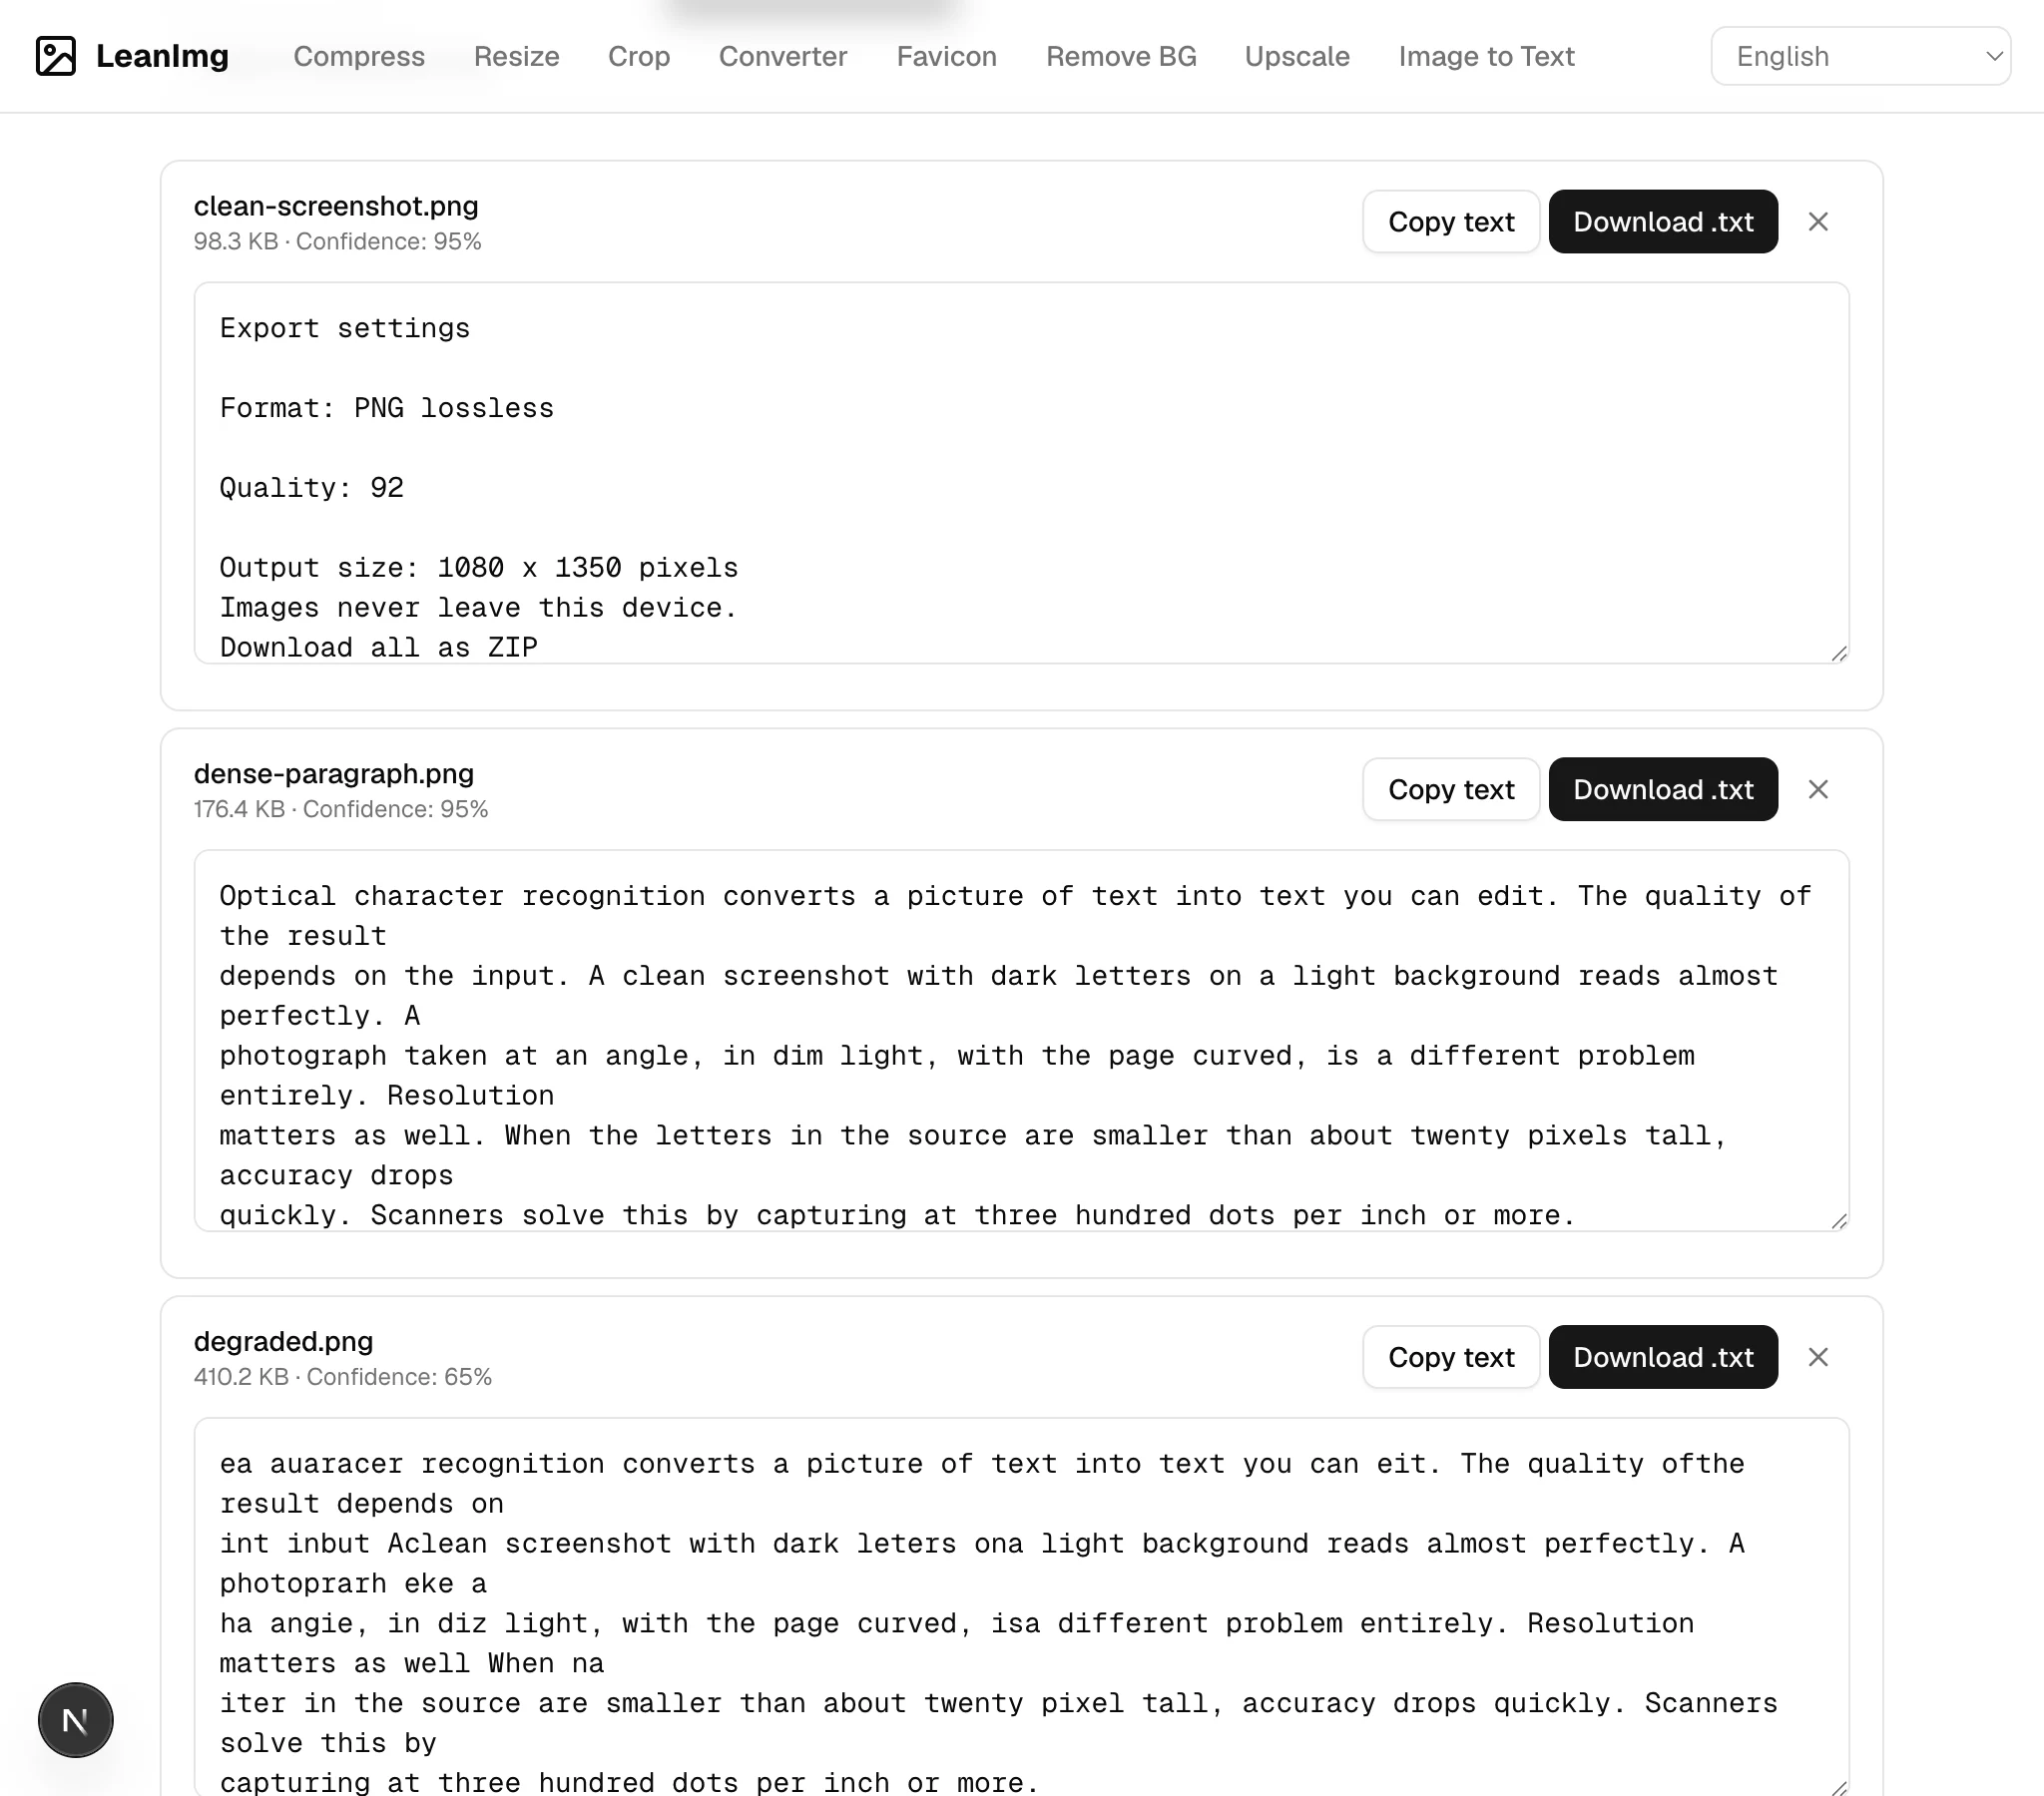
Two of the English fixtures came back at 100.0%, character for character, both at confidence 95. The blurred and rotated copy of the same paragraph landed at 92.4% and confidence 65. That's 7.6 points of similarity gone, and the figure above shows where it went: the opening words are mangled while the middle of the paragraph survives. Confidence 65 also trips the low-confidence warning on the card, so you're told before you copy.
What happens if there's no text in the picture?
This is the part other OCR pages skip. We handed the engine a dark photograph of butterflies over a mossy log, and there's no writing anywhere in it. It returned 515 characters of text that never existed. That's what OCR engines do. They're built to find character shapes, so grain and texture get reported as characters, and no stage in the pipeline decides that a picture is blank.
We don't claim to detect an empty image, because we can't. Every result carries its confidence score, and a warning fires when the average drops below 60. That photo scored 32. A clean screenshot scores 95. The distance between those two numbers is the signal, and it's printed on the card before you touch the text.
Does it read Russian and Japanese?
Nine languages: English, Spanish, Romanian, Arabic, Greek, Turkish, Indonesian, Russian and Japanese. Pick one before you extract, because the engine matches shapes against the model you chose and the wrong model reads badly. There's no automatic detection yet. Both non-Latin fixtures came back clean, Russian at 100.0% and confidence 96, Japanese at 100.0% and confidence 93 once the spacing is normalized, since the engine inserts spaces between Japanese characters.
Each language is a separate model file, tessdata_fast from the Tesseract project, served from this domain like everything else. Adding one costs between about 0.6 and 2 MB the first time you select it, and all nine together are about 11 MB. Your browser keeps them, so it's a one-time cost per language and the second run in any language starts immediately.
When should you not use this?
Handwriting. The Tesseract project says so plainly: you can point it at handwriting, and it won't work very well, because the engine is designed for printed text. Text photographed in a scene is the other weak case, the shop sign and the shelf label. Your phone's built-in text selection handles those better, and a service trained on handwriting will beat us on a letter from your grandmother. We'd rather say that than take the run and hand you a garbled paragraph.
For everything else, the Tesseract quality notes match what we saw in the fixtures: bigger and sharper characters read better, and dark text on a light background is the easy case. Screenshot the source where you can. Where you can't, shoot straight on with even light and fill the frame with the text.
What do I do with the image afterward?
The output is plain text. Copy it with the button, which uses the browser's Clipboard API. Download a .txt per image, or take the whole batch down as one file. Your picture is untouched by any of it. If it has to get smaller before you send it on, the compressor does that in the same tab and the resizer changes the pixel dimensions. Do either one after the extraction. Shrinking a screenshot first throws away the pixels the characters are made of.
Two chains worth knowing. A HEIC photo off an iPhone goes straight in, decoded by the browser before the engine sees it, so there's no format conversion step to do first. And if you only want one block of text out of a long screenshot, run it through the cropper first, so the output is the part you asked for and nothing else. The other model that runs locally in this site is the one that decides which pixels are the subject.
Try it on the worst screenshot you have. Drop it on the image to text tool, pick the language, then read the confidence number before the text.
What about PDFs?
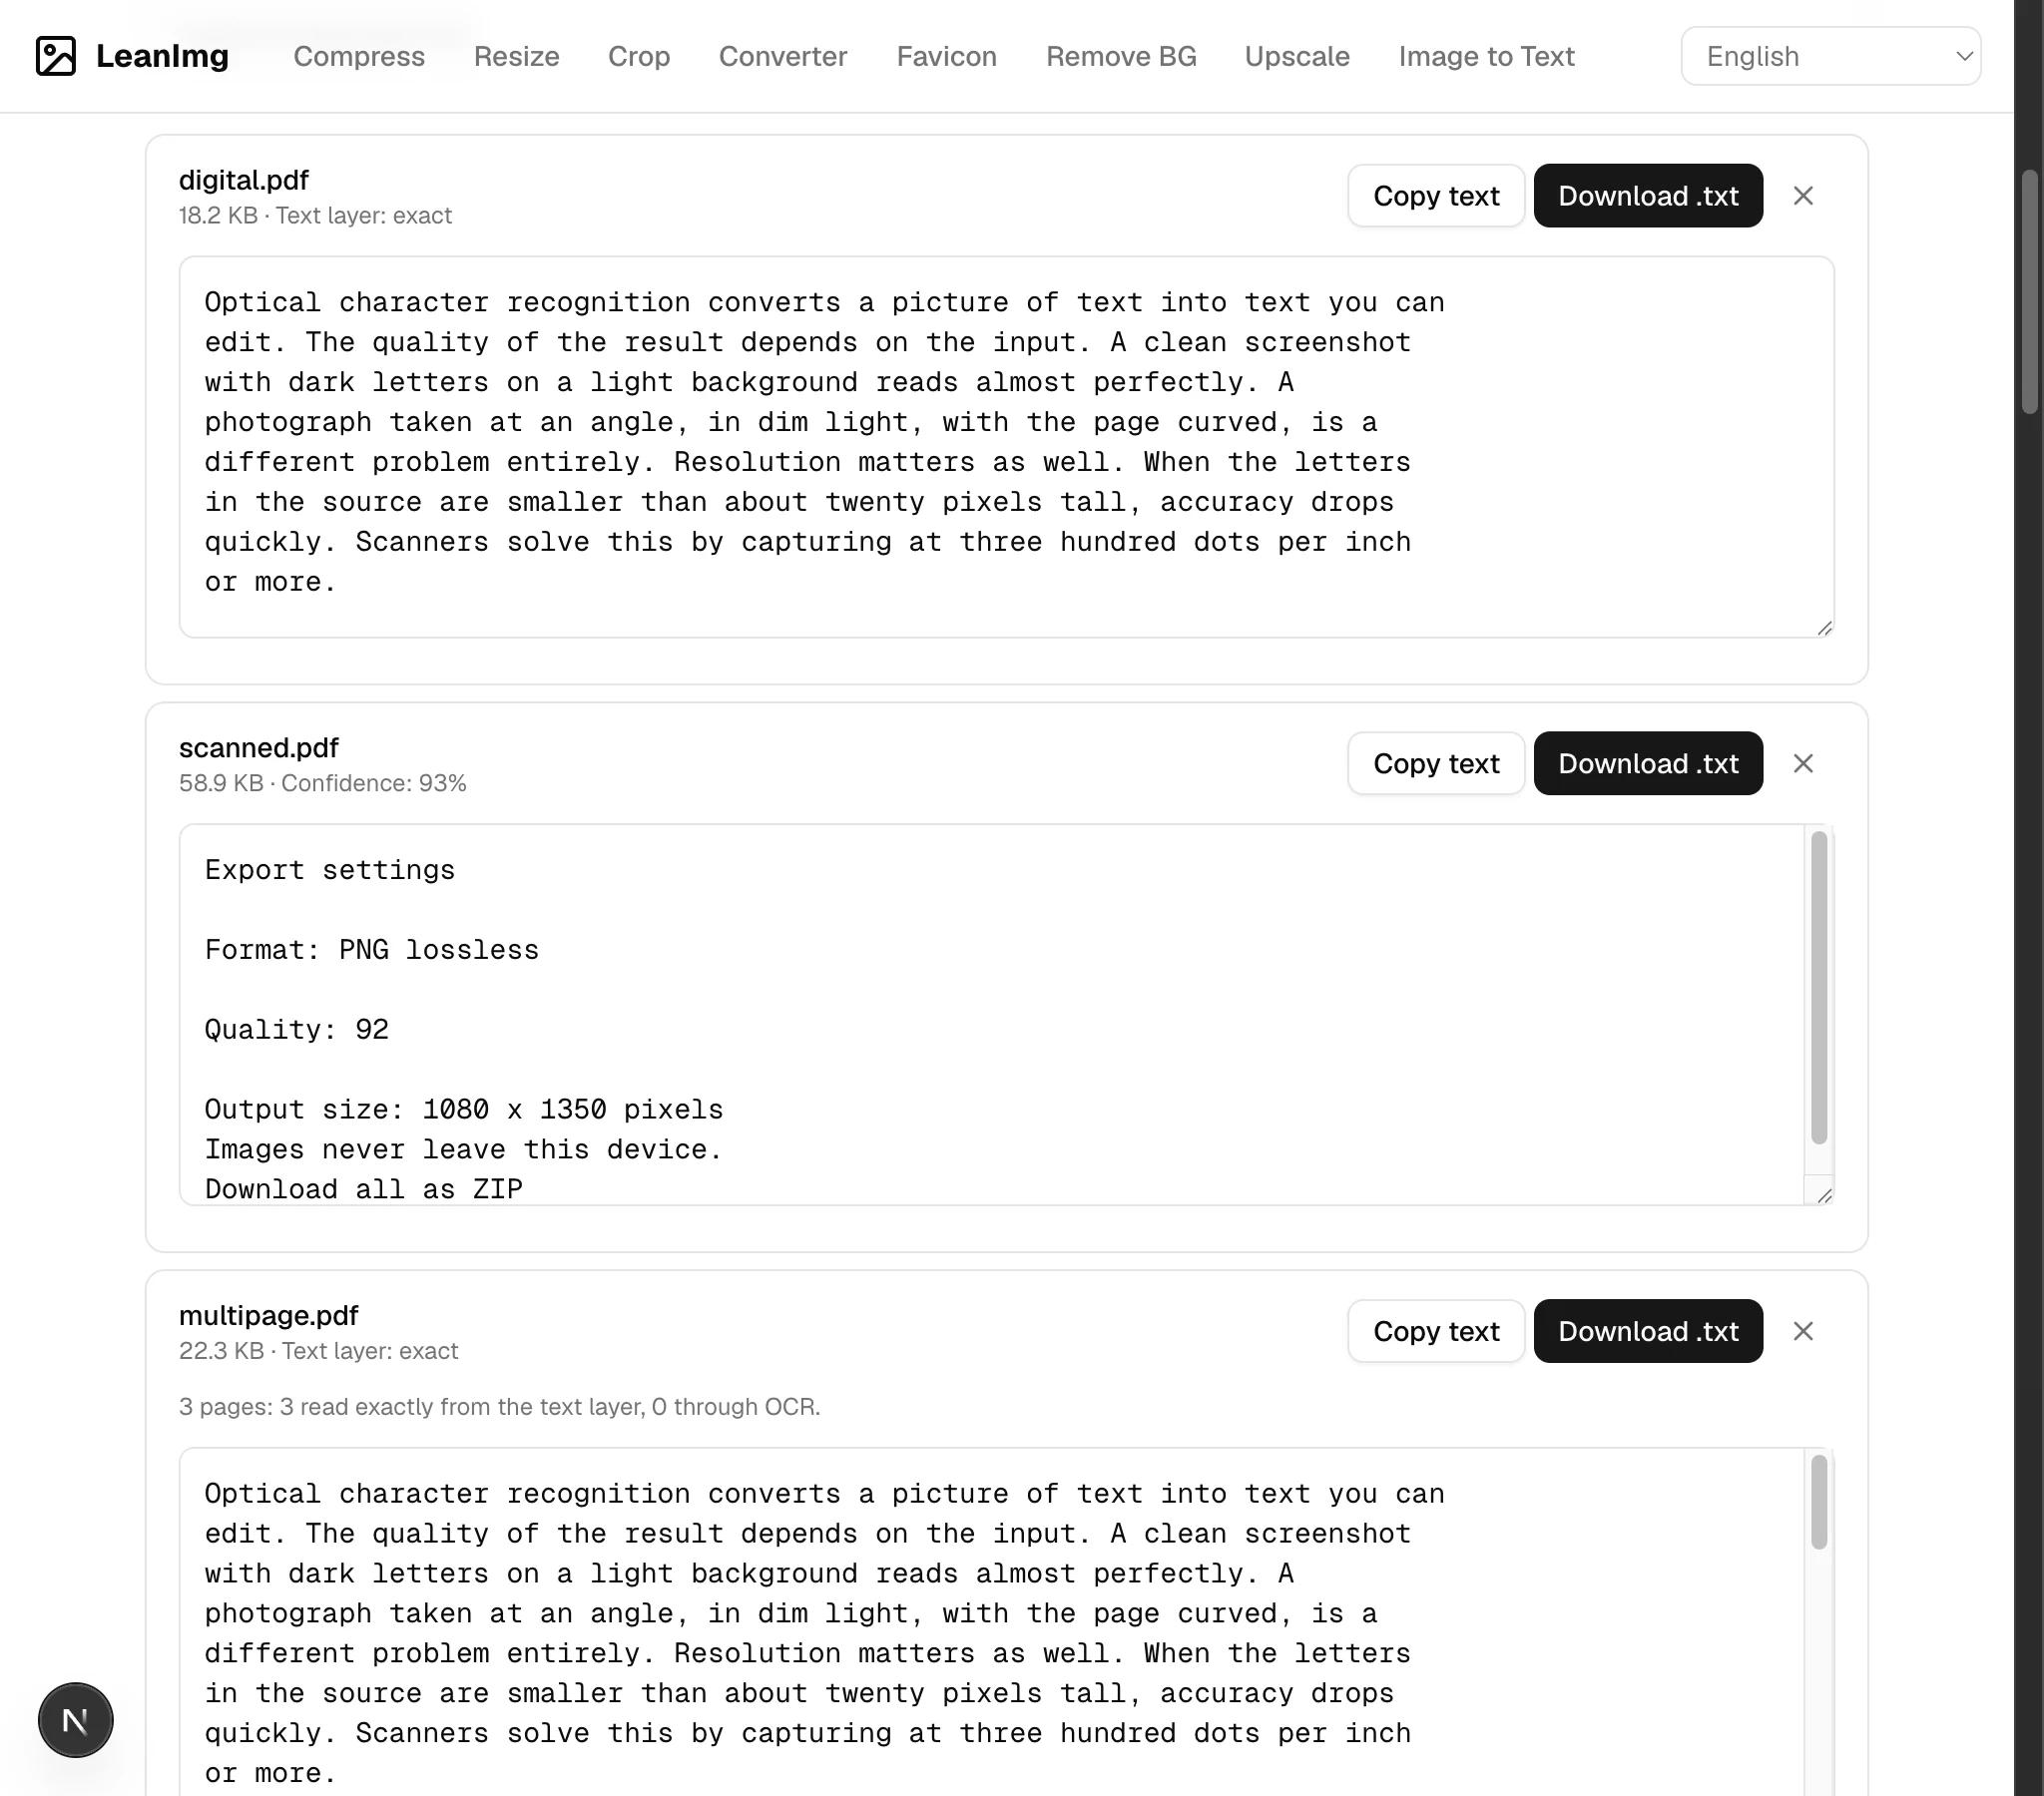
A PDF splits in two before any of this applies. A file exported from a word processor or a browser carries a text layer, so the characters are already in there and pulling them out involves no recognition at all. A file that came off a scanner or a phone is a picture wrapped in a PDF, and it needs the same OCR pass an image does. Our PDF to text page checks every page and picks, and how it decides which pages were read exactly and which were recognized is the longer write-up. On the fixtures, a born-digital file and a three-page digital file both came back at 100.0% straight from the text layer, and a scanned page built with this site's own JPG to PDF converter came back at 100.0% through OCR.
There's a ceiling of 25 pages per file. The oversize fixture is 28 pages, and the run read the first 25 and printed a notice saying so. Split anything longer in a PDF reader and send the rest as a second run. One more thing worth knowing before you start: a PDF pulls about 1.3 MB for the reader on top of the OCR engine and model, and that OCR download still happens when every page turns out to be digital and nothing needs recognizing.
The privacy case is stronger here than it is for screenshots. Bank statements, payslips and scans of an ID are the documents people most want text out of, and they're the ones you'd least want to hand to a stranger's server. The PDF page works the way the image to text tool does, with the file read off your disk into the tab and nothing sent anywhere. If your source is a PDF, start there instead of screenshotting each page.